Week Eight
Click the Arrow to Proceed to Project Page
Click the Arrow to Proceed to Project Page
Making an LED blink with a pushbutton


The process:
For this week, we were asked to use our boards from two weeks ago and write a program to make the LED blink. In order to accomplish this, we were given a multitude of options in terms of programming environments and methodologies. I ended up trying both the Arduino method and the Makefile method, and I used the AVR Atmel programmer because my FabISP from week 3 did not work.
Method:
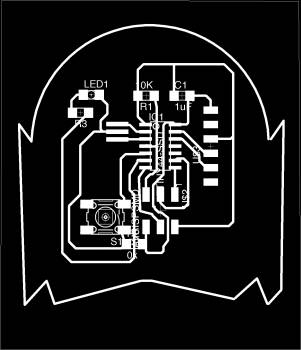
I started by using Eagle to redesign my board in a configuration that had a higher chance of success than the one I had used initially (see my page for week 6). I was pleased to note that this process took me much less time than it had the first time, though I used the "illegal" move of using a 0 ohm resistor as a jumper. I was not entirely sure what resistor to connect to the LED, so I ended up going with a 500 ohm resistor. I used the 20 MHz resonator instead of the crystal. I made some potentially fatal errors when milling : one of my traces violated the DRC and ended up being connected to one of the pads. I decided to manually alter this with an exacto knife, but in doing so I also cut through another trace - I didn't notice this as the time, but it became an issue later. Luckily, I was able to add some solder and fix the issue.
SOME SOLDERING TIPS:
- to add resonator: put on the solder traces, then melt using a high temp heat gun, then put on resonator
-I burned my board a bit by doing this, so be careful
- I used this same method for the button which also lacks clear feet.
- For other pieces, put a piece of solder on one leg, carefully solder the other legs, then go back and fix the initial point
Programming
I started by using the instructions on Tomer's page to use brew to isntall avr dude. Pip included some excellent visuals on her page to explain the processes and the differences between the Arduino method and the Makefile method. Since I had never tried embedded programming before, this was incredibly helpful to me:

Once avrdude had been installed, I used the terminal to follow the programming instructions that Neil had placed in the png on the class site.
make -f hello.ftdi.44.echo.c.make - creates a make file
(My understanding is that this is something like a set of instructions for C)
The C file is a text file that contains the code necessary to instruct how to execute the given program. Each .c files has to have a .make counterpart.
First step is to create a .hex file. This transfers the .c instructions into bit information [0 0 0 0 0 1 0, for example].
Next: make -f hello.ftdi.44.echo.c.make program-usbtiny-fuses
My understanding is that this programs the fuses, or checks them in some fashion. Either this step or the next one also tells the board to use the 20 MHz clock instead of the 8 MHz one that is internal to the microcontroller.
The first time that Juliana and I tried this, we received the following error:

We decided that this error was probably the result of the fact that we were using the Avr Atmel programmer instead of the FabISP, so we went back to Makefile with the FabISP (on the class website), and realized that we should try changing a line of code. Instead we ran:
program-avrisp2-fuses: $(PROJECT).hex
avrdude -p t44 -P usb -c avrisp2 -U lfuse:w:0x5E:m
We didn't need to change the project name because we were still trying to call the same .c file.
This resulted in ERROR: BAD AVRISPmkII connection status: RST fail, Target detected …. This indicates that the crystal may have failed? or board has some issues…
So we tried the
tried the line program-avrisp2: $(PROJECT).hex
avrdude -p t44 -P usb -c avrisp2 -U flash:w:$(PROJECT).c.hex
and we got the same error.

We took a break to use the multimeter to check our connections, and it turns out that the trace I had cut earlier was indeed a problem. I soldered the broken trace, and tried the code again. The first two steps worked, third step worked, but intermediate error = avrdude: stk500v2_recv_mk2: error in USB receive
We proceeded to run make -f hello.ftdi.44.echo.c.make program-usbtiny
to program the .c instructions onto the board, though it uses the fabISP as the programer again. Ultimately, after fixing the traces, I was able to get this to work.
The next step was to run Neil's echo program to see if the board worked.
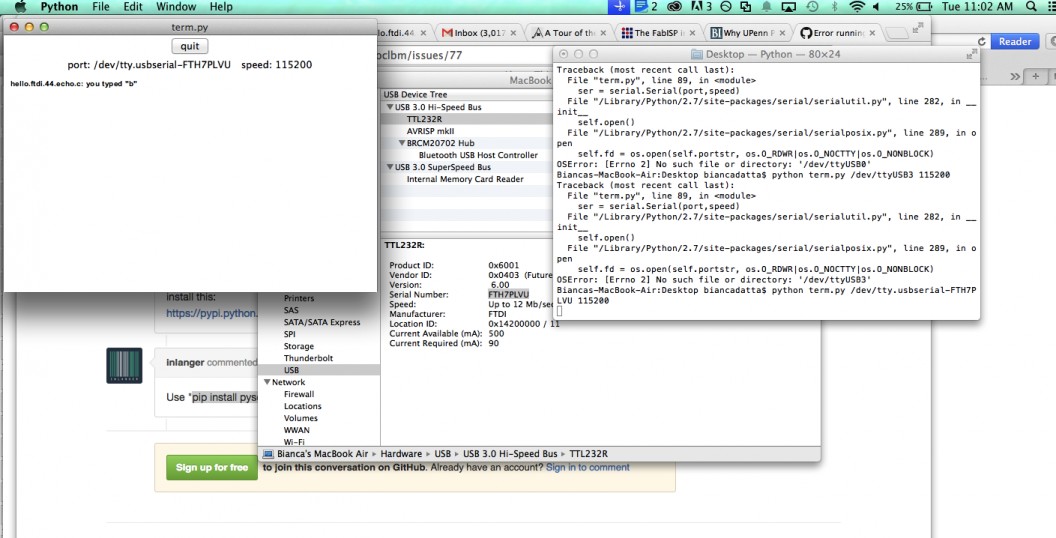
I then downloaded the term.py file from the class website. After some fiddling around, I installed python, then used brew to install pip, then ran python term.py. I had to install a serial pack , and ultimately changed the command to /dev/tty.usbserial-FTH7PLVU 115200 . Figure out where the board is by going to about this mac, system info, hardware, find serial number of the FTDI, type that in. If you use term.py without specifying the numbers afterwards, it gives you a speed error.
After some fiddling, it worked!
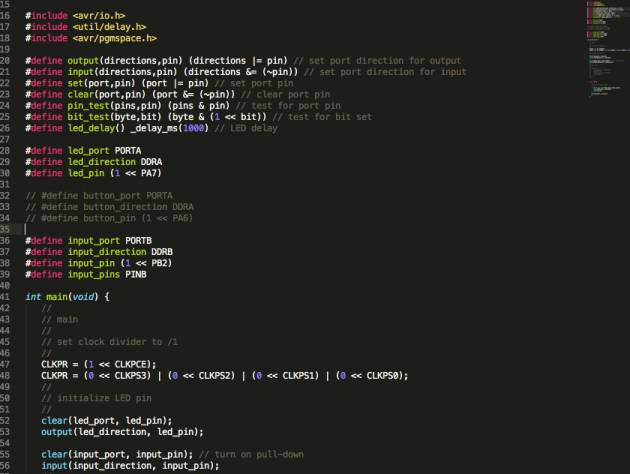
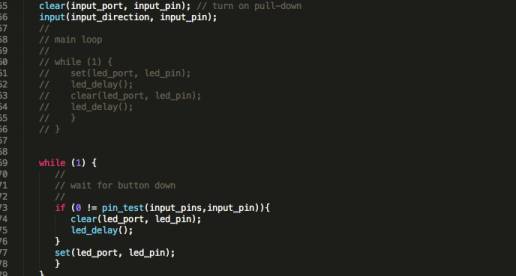
No that I knew that the board could be programmed, it was time to try using my own program. I looked at the data sheet for the ATTiny44 to establish which ports the LED and button were connected to. To start out with, I tried to use the blink code that Neil posted on the class page.
I changed LED to PA7, and got the following error:
Biancas-MacBook-Air:Desktop biancadatta$ make -f hello.arduino.328P.blink.c.make
make: hello.arduino.328P.blink.c.make: No such file or directory
make: *** No rule to make target `hello.arduino.328P.blink.c.make'. Stop.
Biancas-MacBook-Air:Desktop biancadatta$ make -f hello.arduino.328P.blink.make
avr-gcc -mmcu=atmega328p -Wall -Os -DF_CPU=20000000 -I./ -o hello.arduino.328P.blink.out hello.arduino.328P.blink.c
hello.arduino.328P.blink.c: In function 'main':
hello.arduino.328P.blink.c:35:4: error: 'PA7' undeclared (first use in this function)
hello.arduino.328P.blink.c:35:4: note: each undeclared identifier is reported only once for each function it appears in
make: *** [hello.arduino.328P.blink.out] Error 1
Biancas-MacBook-Air:Desktop biancadatta$
I played around with the code a bit more, and changed the lines which included a different microcontroller to say ATTiny44, but the code still did not work.
I decided to use Travis's code instead (with minor edits for ports and such) (see end of this page for a link to his page), which looked like this:
This resulted in the following errors:
avrdude -p attiny44 -P usb -c usbtiny -U lfuse:w:0x56:m
avrdude: Error: Could not find USBtiny device (0x1781/0xc9f)
avrdude done. Thank you.
make: *** [program-usbtiny-fuses] Error 1
After some more experimentation with the makefile, I received an error message stating that I was missing a separator. I tried editing the code to ensure that all of the necessary tabs were present, but I couldn't fix the error. I played around with the code for a bit more before deciding to switch to the Arduino method.
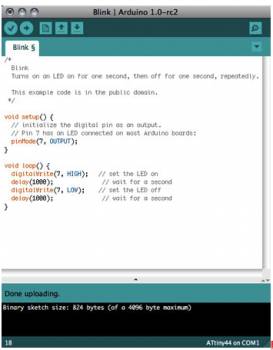
Using the tutorial on High-Low Tech, I set up the IDE to recognize my board and programmer, and then used the following code:
When I tried to burn the bootloader I received an error message. I couldn't figure out what the problem was, but Isuspect that it has something to do with the communication between my computer and the programmer. I think I may have set up the IDE to use the wrong programmer.
Going Forward
I might try to borrow someone's FabISP to try to burn the Arduino Bootloader again. I would also try a slightly different make file and see if the separator issue can be resolved. I'd like to have the LED do some more interesting things: for instance, if the button could be set to work as a dimmer for the LED until it ultimately turned it off.
Thanks to Alexis, Juliana C, Juliana N, Palash, Tomer, Jeff, and Dan Novy for their help, support, and snacks :).
Some excellent resources were : Irina's Page which explained the reasoning behind each step, Pip's Page which had the informative diagram of how the arduino workflow compares to the C/C++ workflow, Travis's Page which had some useful example code, Charles's Super Useful Tutorial, Laia's helpful page, and the High- Low Tech arduino tutorial. Some combination of these pages helped me to learn (at least some) embedded programming basics.